


Photo by Levart_Photographer on Unsplash
Building a Chatbot Website with GPT-3.5-Turbo API: A Step-by-Step Guide


The release of “ChatGPT API” on March 1st, 2023 has opened up a new era of possibilities for businesses and individuals. With GPT-3.5’s natural language processing capabilities, users can create chatbots that can seamlessly interact with people for various purposes such as answering questions, writing novels, accounting, and even providing therapy. The potential uses of this API are limited only by people’s imagination, and it’s exciting to see how developers will continue pushing the boundaries of what’s possible with AI in the future.
While there have been enough tutorials on the internet for the past week, it’s still worth writing about an end-to-end working guide about the usage of ChatGPT API, Streamlit, and Docker to release a decent website for yourself, your friends, or a small business in a very short time.
This step-by-step guide will help you build a chatbot website powered by GPT-3.5-Turbo API in no time. You’ll learn how to use Streamlit and Docker to create a website that can interact with people seamlessly. This guide is perfect for anyone who wants to create a chatbot website but doesn’t know where to start.
Why do You need to Create Your Own Chatbot Website?
There are several reasons why you should create your chatbot website. One of the main reasons is that the free version of ChatGPT has high daily traffic, which can make it difficult to log in and use smoothly. While the pro version is available at the cost of $20 per month, it may not be a cost-effective option for casual users who do not require advanced features. A “pay as you go” model would be more appealing to many users who only require occasional usage of the platform. However, ChatGPT does not offer this option.
Fortunately, the recently released Chat Completion API (aka. ChatGPT API) utilizes GPT-3.5-turbo models at the cost of just $0.002 per 1k tokens. This presents a much more affordable option for common usage when the API access is much more stable with no peak traffic troubles. Furthermore, building a website to chat using GPT 3.5 (the same model employed by ChatGPT) via API does not make you tolerate the slow “thinking” and “typing” response time that ChatGPT spends to mimic human beings. All chatting responses are quick and straightforward.
Although your initial website may appear basic, once you’ve created it, adding additional features will become a breeze, enabling you to reach your commercial potential.
Enough for theory, let’s start.
Creating OpenAI API Keys
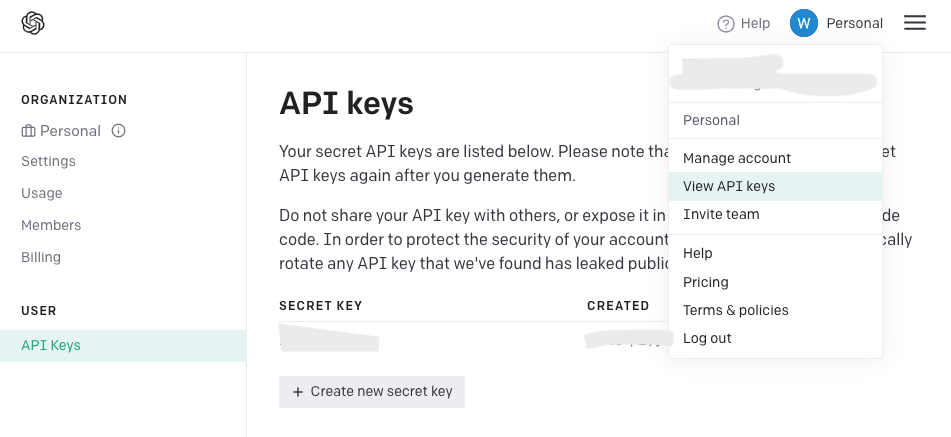
If you’ve already requested an OpenAI API Key in your account, you can keep using that one instead of generating a new one. If this is your first time using OpenAI API, please sign up for a new OpenAI account and find the below page from your account menu:"
Chat Completion APIs
The newly released “ChatGPT” API is called Chat Completion, and you can find the documentation here. The usage is very straightforward, even if you have no experience with other OpenAI APIs before. To get an answer from GPT-3.5, all you need to do is:
Install the package
Generate an API key
Call the API with your question
Please note that the entire API key will only be displayed once after generation, so you’ll need to copy it somewhere safe for further usage. I copied mine directly to the code for demonstration purposes only, which is not recommended for your applications.
Install the package
!pip install openai
import the module
import openai
Create and send the prompt
complete = openai.ChatCompletion.create(
  model="gpt-3.5-turbo",
  messages=[
        {"role": "system", "content": "You are a helpful assistant."},
        {"role": "user", "content": "Who won the world series in 2020?"},
        {"role": "assistant", "content": "The Los Angeles Dodgers won the World Series in 2020."},
        {"role": "user", "content": "Where was it played?"}
    ]
)
Receive the response
message=complete.choices[0].message.content
Streamlit & Streamlit_chat
Streamlit is an open-source framework that enables data scientists and developers to quickly build and share interactive web applications for machine learning and data science projects. It also offers a variety of widgets that only require one line of Python code to create, such as st. table(…). For our purpose of creating a simple chatbot website for private usage, Streamlit is a suitable library with a third-party Streamlit_chat library that provides further convenience to generate a “chat-style” web application. This way, we don’t have to deal with many HTML elements and CSS stuff.
ChatGPT API Usage
There is a new usage of message bodies compared to other legacy GPT models. The list of messages will contain several objects of messages that perform the feature of “Chat”. The system, user, and assistant are the three roles newly defined in the message objects. The system message is defined to set the behavior of the chatbot by adding an instruction in the content. However, as mentioned in the introduction, this power has not been fully released in GPT-3.5-Turbo-0301 yet. The user message represents an input or inquiry from the user, while the assistant message refers to the corresponding response from the GPT-3.5 API. This dialog exchange simulates a human-like conversation, with the user message initiating the interaction and the assistant message providing a relevant and informative answer to give the chat model context for this conversation to generate a more relevant response later on. The last user message refers to the prompt requested at the current moment.
To set up a website and release it on the Internet, only a few steps are required
Install the package
!pip install streamlit
Create a Python file “demo.py” with the below code
import streamlit as st

st.write("""
# My First App
Hello *world!*
""")
Run on your local machine or remote server
!python -m streamlit run demo.py
After this output is printed, you can visit your web through the address and port listed:
You can now view your Streamlit app in your browser.

  Network URL: http://xxx.xxx.xxx.xxx:8501
  External URL: http://xxx.xxx.xxx.xxx:8501
Building the Chatbot Application
The running data for web operations are all managed by the object session_state of Streamlit. We defined a prompts list to store the prompt messages that start from the system role message and are appended by the user and assistant on every chat generated.
For the system role message, I added an additional instruction “with a little humor expression” into the content, and it really works! When I asked how to become a billionaire, it recommended robbing a bank for fun. Such settings remind me of “TARS” in the movie “Interstellar”.
Another two session_state objects are used to store all API responses (generated) and all user prompts (past) for display pair by pair in chat style with Streamlit_chat function message().
There are two buttons created by the Streamlit widget: Send to activate ChatCompletion request and New Chat to clean up the chat history in both prompts object and chatting display. These behaviors are defined in the callback function chat_click() and end_click().
To fully duplicate ChatGPT’s user experience, we also need to consider displaying full markdown features from API responses like code snippets, tables, etc. Unfortunately, the chatting bubble by streamlit_chat cannot display markdown contents very well. So I use the tabs widget to separate plain text in bubble display as normal and markdown display as rich in cases of structured text like code.

The entire Python code is pasted below which you can directly copy:
import openai
import streamlit as st
from streamlit_chat import message

openai.api_key = '{Your API key}'
if 'prompts' not in st.session_state:
    st.session_state['prompts'] = [{"role": "system", "content": "You are a helpful assistant. Answer as concisely as possible with a little humor expression."}]
if 'generated' not in st.session_state:
    st.session_state['generated'] = []
if 'past' not in st.session_state:
    st.session_state['past'] = []

def generate_response(prompt):
    st.session_state['prompts'].append({"role": "user", "content":prompt})
    completion=openai.ChatCompletion.create(
        model="gpt-3.5-turbo",
        messages = st.session_state['prompts']
    )

    message=completion.choices[0].message.content
    return message

def end_click():
    st.session_state['prompts'] = [{"role": "system", "content": "You are a helpful assistant. Answer as concisely as possible with a little humor expression."}]
    st.session_state['past'] = []
    st.session_state['generated'] = []
    st.session_state['user'] = ""

def chat_click():
    if st.session_state['user']!= '':
        chat_input = st.session_state['user']
        output=generate_response(chat_input)
        #store the output
        st.session_state['past'].append(chat_input)
        st.session_state['generated'].append(output)
        st.session_state['prompts'].append({"role": "assistant", "content": output})
        st.session_state['user'] = ""

st.image("{Your logo}", width=80)
st.title("My ChatBot")

user_input=st.text_input("You:", key="user")

chat_button=st.button("Send", on_click=chat_click)
end_button=st.button("New Chat", on_click=end_click)

if st.session_state['generated']:
    for i in range(len(st.session_state['generated'])-1, -1, -1):
        tab1, tab2 = st.tabs(["normal", "rich"])
        with tab1:
            message(st.session_state['generated'][i], key=str(i))
        with tab2:
            st.markdown(st.session_state['generated'][i])
        message(st.session_state['past'][i], is_user=True, key=str(i) + '_user')
After the streamlit command is executed, your ChatBot website will go live http://{Your IP address}:8501 as default!
!python -m streamlit run demo.py
Another two optional steps
Ask users or yourself to visit your ChatBot by typing http://111.22.333.44:8501 looks a little unprofessional so please consider another two steps to finalize your go-live.
Use a domain name instead of an IP address
You can try to buy a cheap domain with strong personal branding on https://www.namesilo.com/ and direct it to your server IP in Namesilo’s management panel.
Deploy on port 80
As Streamlit does not support taking over port 80 for your web service port, if you want to prevent the users from typing something like:8501 to visit your website, you could deploy your Streamlit application using Docker and use Docker to map port 80 to your actual Streamlit port.
The tutorial for setup Docker and running your Streamlit application in it can be found here.
Please feel free to contact me for any development issues and also ask for my demo web address (sorry I cannot share it in the article as the usage of OpenAI API costs me money…)
That’s it.
Hope you can find something useful in this article and thank you for reading!